
Installing a gas shut off valve is crucial for safety. Many homeowners overlook this essential task. Proper gas shut off valve installation can prevent leaks and ensure quick access during emergencies.
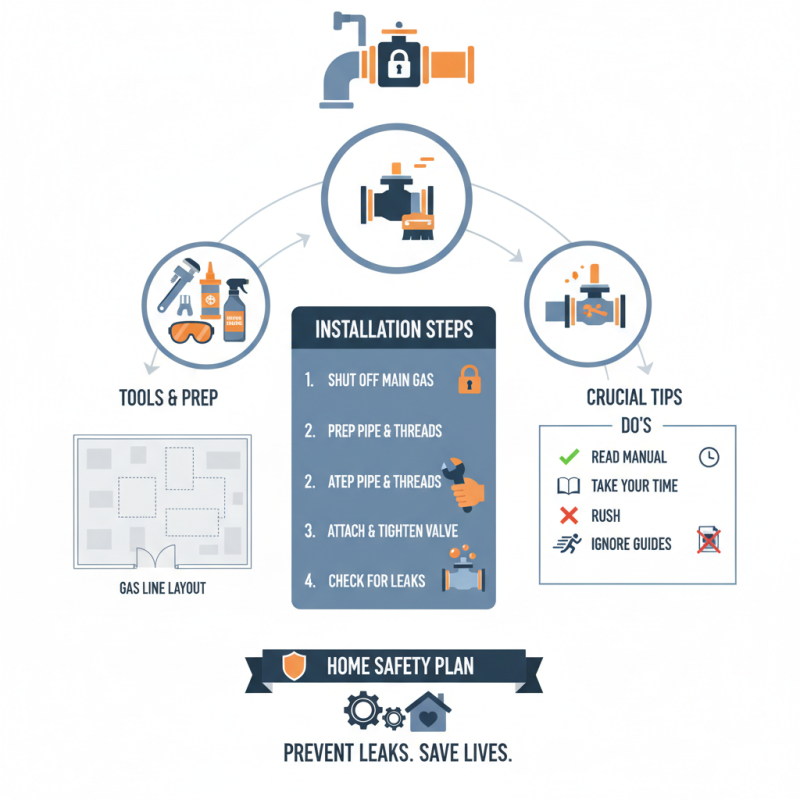
This guide focuses on the techniques involved. It highlights the tools you will need. Understanding the layout of your gas lines is equally important. Each step is detailed to facilitate a safe and effective installation process.
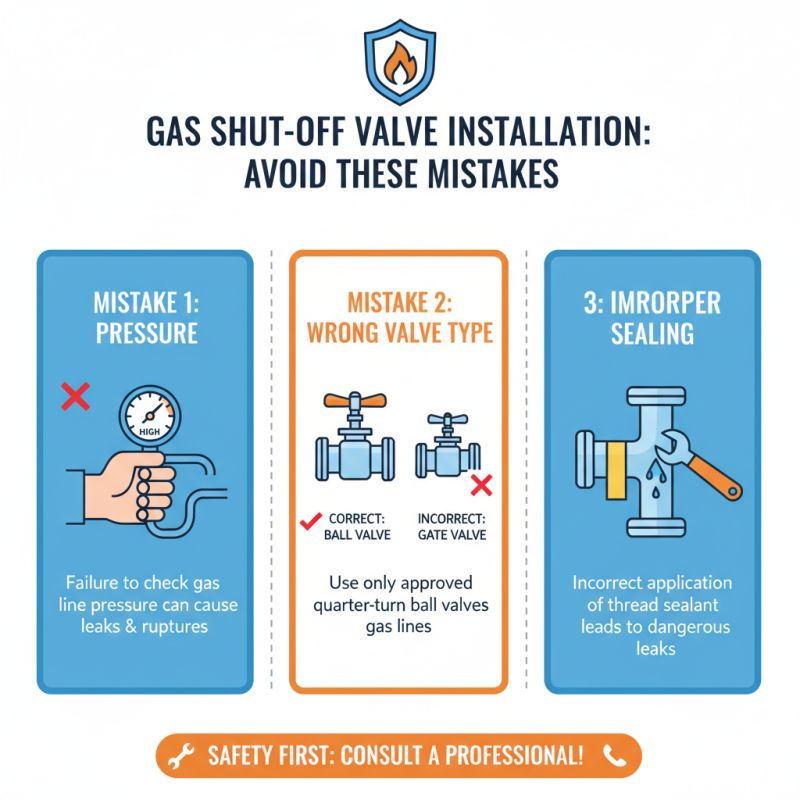
Reflecting on common mistakes can lead to improvement. Many people rush through the installation. Ignoring manufacturer guidelines often results in problems later. Hence, taking the time to understand the process is vital. A well-installed gas shut off valve can save lives. Don't underestimate its importance in your home safety plan.
Gas shut off valves are critical for safety in residential and commercial settings. According to the National Fire Protection Association (NFPA), gas leaks accounted for over 60% of fires related to gas usage in 2021. When a leak occurs, rapid access to a shut off valve can prevent devastating consequences. These valves act as the first line of defense, stopping gas flow immediately.
Installation techniques are crucial. Proper placement of the gas shut off valve is essential. The valve should be easily accessible and clearly marked. Regular maintenance checks can identify potential issues before they escalate. A study by the American Society of Mechanical Engineers (ASME) found that homes with properly installed shut off valves demonstrated a 30% decrease in gas-related incidents.
While many properties have shut off valves, access can be overlooked. Inadequate awareness and poor training often lead to delays during emergencies. Even with existing safety measures, human error can lead to dangerous situations. Regular training and updates on installation techniques are vital. This emphasizes the importance of understanding the role these valves play in overall safety measures.
Installing a gas shut off valve requires specific tools and materials to ensure safety and functionality. According to industry reports, 30% of installation failures are attributed to inadequate preparation. Essential tools include wrenches, pipe cutters, and Teflon tape. Always use a wrench that fits your valve size correctly. Improper tools can lead to leaks.
Materials matter too. High-quality valves are crucial. Plastic or low-grade materials can compromise safety. Industry standards indicate that using appropriate fittings and seals can reduce leak risks significantly. It’s advisable to check the compatibility of materials. Even slight mismatches can lead to future issues.
Preparation is vital. Have a clear plan before starting. Ensure your workspace is clean. Distractions can lead to mistakes. Take time to double-check measurements. A small error can lead to bigger problems later on. Always prioritize safety. The right tools and materials enhance the installation's safety and effectiveness.
Installing a gas shut-off valve requires precision and care. Start by gathering tools: a wrench, Teflon tape, and a pipe cutter. Make sure your workspace is safe. Clear any flammable materials nearby. It’s crucial to turn off the main gas supply before you begin.
Once you've prepared, measure the length of pipe needed. Cut the pipe carefully, ensuring clean edges. Attach the valve, wrapping Teflon tape around the threads to prevent leaks. It’s easy to overlook this step, but even a small leak can be dangerous. Tighten the connections gently. Over-tightened valves can crack.
After installation, check for any gas smell. It’s vital to test for leaks. Use soapy water to identify bubbles in the connections. If bubbles appear, it indicates leaks. You might feel frustrated if things don’t go as planned. Reflect on your process and make adjustments. Taking your time ensures safety and functionality.
| Step | Description | Tools Required | Estimated Time |
|---|---|---|---|
| 1 | Gather necessary tools and materials. | Wrench, Pipe Cutter, Teflon Tape | 15 minutes |
| 2 | Shut off the main gas supply. | None | 5 minutes |
| 3 | Remove the old valve if applicable. | Wrench, Pipe Cutter | 20 minutes |
| 4 | Install the new gas shut off valve. | Wrench, Teflon Tape | 30 minutes |
| 5 | Check for leaks using a soap solution. | Soap Solution, Brush | 10 minutes |
| 6 | Turn on the gas supply and test the valve functionality. | None | 5 minutes |
Installing a gas shut-off valve is crucial for safety. However, many people make common mistakes during installation that can lead to serious issues. One significant mistake is not checking the gas line pressure. Proper pressure readings ensure the valve can handle the flow without leaks.
Another frequent error involves improper alignment. If the valve isn’t aligned correctly with the pipe, it may not function properly. This can lead to gas leaks, posing dangers. Always take your time to align pipes and fittings accurately. A quick inspection can prevent accidents later.
Tips: Double-check all connections to avoid leaks. Sealant may be necessary to ensure a tight fit. Don't rush through the process; haste can lead to overlooked details.
Don’t ignore the manual. Many overlook installation instructions, assuming they know best. This assumption can lead to mistakes. Follow the guidelines closely for a safer installation. A little attention to detail goes a long way in ensuring safety and functionality.
Gas shut-off valves are crucial for safety in residential and commercial settings. They prevent gas leaks that can be catastrophic. Regular maintenance is essential for optimal functionality. Studies show that 70% of gas-related accidents occur due to malfunctioning valves. Regular inspection and upkeep can reduce this risk.
One key maintenance tip is to check the valve's operation monthly. A simple twist can reveal if it opens and closes smoothly. Look for signs of corrosion or damage. A leak test can be done using a soap solution. Bubbles indicate a leak. It is important to ensure that the entire valve assembly is free of debris. Dust or grime can impede its performance.
Another aspect to consider is the age of the valve. Many valves have a lifespan of 10 to 15 years. However, factors like environmental conditions can shorten this. If your valve shows wear, it might need replacement. Skipping this step could lead to serious implications. Regularly reviewing and documenting maintenance activities is advisable to avoid future issues.
© Copyright 2025 | LittleFirefighter.com | All Rights Reserved | 1EZ Creative: Orange County Web Design
Fusce ut ipsum tincidunt, porta nisl sollicitudin, vulputate nunc. Cras commodo leo ac nunc convallis ets efficitur.

12345 North Main Street,
New York, NY 555555
1.800.555.6789
sale@vibrotools.com
